

Controlling Module Access
Use the page to restrict access to the module, as follows:
Temporarily enable the module to receive firmware upgrades via FTP. When the firmware upgrade is complete, it is recommend that you disable the ability of the module to receive FTP transfers of firmware upgrades.
Enable Ethernet access control; then restrict module access to up to 32 hosts per subnet on the Ethernet network. When access control is disabled, the module accepts Ethernet communications from any IP address.
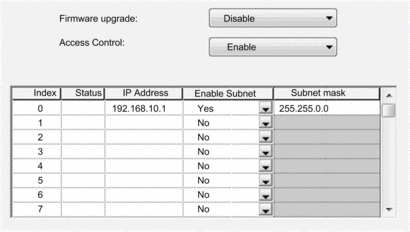
The dialog:
IP Addresses to Be Added
When access control is enabled, add the following IP addresses to the list:
Any network host that may send an Ethernet transmission to the module
Your own maintenance PC so that you can communicate with the module via Control Expert to configure and diagnose your application
Security Commands
You can set the following flags in the dialog:
Parameter |
Description |
|---|---|
Firmware Upgrade |
Select either:
|
Access Control |
Select either:
|
Adding and Removing IP Addresses in the Authorized Access List
To add IP addresses to the list, follow these steps:
Step |
Action |
|---|---|
1 |
In the field, set to . |
2 |
In the area, click in the field in the next empty row. |
3 |
Enter the IP address you wish to add to the list. |
4 |
If the IP address requires a subnet mask, do the following: In the column, do one of the following:
|
5 |
Repeat steps 2...4 for each IP address you want to add to the list. |
To remove an IP address from the list, highlight the row and press the key on your keyboard.