

At a Glance
The analog I/O modules are powered by the rack bus. The modules may be installed and uninstalled without turning off power supply to the rack.
Fitting operations (installation, assembly, and disassembly) are described below.
Before Installing a Module
Before installing a module, take off the protective cap from the module connector located on the rack.
| DANGER | |
|---|---|
Selecting a Backplane
Install the analog I/O modules on one of the following Ethernet backplanes:
Backplane |
Description |
|---|---|
BME XBP 04001 |
4-slot Ethernet backplane |
BME XBP 0400(H)1 |
4-slot hardened Ethernet backplane |
BME XBP 08001 |
8-slot Ethernet backplane |
BME XBP 0800(H)1 |
8-slot hardened Ethernet backplane |
BME XBP 12001, 2 |
12-slot Ethernet backplane |
BME XBP 1200(H)1, 2 |
12-slot hardened Ethernet backplane |
1. The following reserved slots are not available for module installation:
2. The following reserved slots are not available for module installation: slots 2, 8, 10 and 11, which are reserved for gateway communication modules. |
|
The HART analog modules may be installed in any of the slots in the backplane except for the reserved slots described in the table footnotes, above.
Power is supplied to the I/O modules by the bus at the bottom of the rack (3.3 V and 24 V).
Installation
The diagram below shows a HART analog I/O module mounted on the rack.
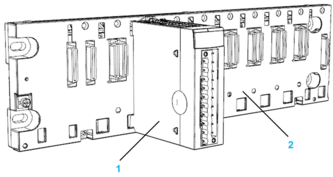
The assembly includes the following components:
Number |
Description |
|---|---|
1 |
20-pin terminal block module |
2 |
8 slot Ethernet backplane |
Installing the Module on the Rack
To mount the analog I/O modules on the backplane, follow these steps:
Step |
Action |
Illustration |
|---|---|---|
1 |
Position the locating pins situated at the rear of the module (on the bottom part) in the corresponding slots in the rack. NOTE: Before positioning the pins,
remove the protective cover.
|
Steps 1 and 2 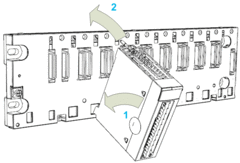 |
2 |
Swivel the module towards the top of the rack so that the module sits flush with the back of the rack. It is now set in position. |
|
3 |
Tighten the retaining screw to hold the module in place on the rack. Tightening torque: 0.4...1.5 N•m (0.30...1.10 lbf-ft). |
Step 3 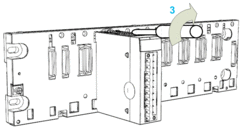 |